Hardware requirements
The OpenStack cloud enviroment will run at top of the operating system CentOS 7.9. Also it is necessary to provide at least 16GB of RAM.
Installation for single-node deployment
echo "158.193.153.10 hostname.example.com" >> /etc/hosts
systemctl stop firewalld NetworkManager
systemctl disable firewalld NetworkManager
setenforce 0
yum update

vi /etc/selinux/config
# Change state to „disabled“.

shutdown -r now
yum install centos-release-openstack-train
yum upgrade
yum install -y openstack-packstack
packstack --allinone --os-neutron-l2-agent=openvswitch --os-neutron-ml2-mechanism-drivers=openvswitch --os-neutron-ml2-tenant-network-types=vxlan --os-neutron-ml2-type-drivers=vxlan,flat --provision-demo=n --os-neutron-ovs-bridge-mappings=extnet:br-ex --os-neutron-ovs-bridge-interfaces=br-ex:ens192
# Switch --os-neutron-ovs-bridge-interfaces=br-ex:ens192 determines physical interface that will be connected to virtual bridge OVS interface
Installation for multi-node deployment
On host (compute node) we can repeat the same steps until command „shutdown -r now“. Next we will generate „answer file“ using the command:
packstack --gen-answer-file=/root/answer.txtIn that file we will modify value for parameter CONFIG_COMPUTE_HOSTS to an IP address of host we want to install OS on.
Also we have to modify value for parameter CONFIG_NEUTRON_OVN_TUNNEL where we specify the interface through which the communication will take place. In addition It is recommended to define CIDR subnets in CONFIG_NEUTRON_OVN_TUNNEL_SUBNETS section.
Note:
It is possible to enter ovs_tunnel instead of ovn_tunnel. The difference is not clear yet but it caused the installation end with an error.
When we have already installed some of hosts, we need to specify them in EXCLUDE_SERVERS section and therefore we can run the installation using the command:
packstack --answer-file=/path/to/answer/file/ User manual
There are two options how to configure OpenStack cloud enviroment. One of them is by using a CLI, the other one is by using OpenStack web GUI. To login into web GUI, we need to obtain a password for an admin account by using the command in root directory:
cat keystonerc_adminAdding a new network and a router with floating IP
# creating a new network
openstack network create external_network --external  --provider-network-type flat --provider-physical-network extnet --share

# creating a subnet for the netork
openstack subnet create ext-sub --subnet-range 10.10.10.0/24 --gateway 10.10.10.1 --no-dhcp --allocation-pool start=10.10.10.36,end=10.10.10.37 --network external_network

# creating of a router
openstack router create router1

# assigning of the external gateway to the router
openstack router set router1 --external-gateway external_network --enable-snat

# allocation of a floating IP for the certain project
openstack floating ip create external_network --project admin
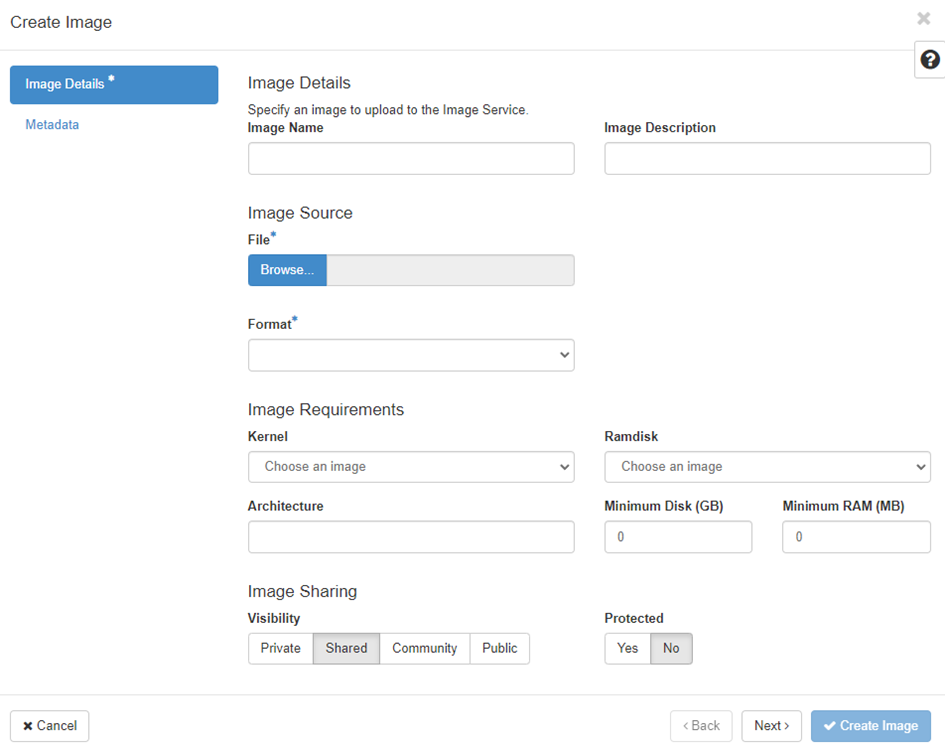
How to import new image
Recording to official documentation it is possible to import images in various formats ( raw, qcow2, vmdk etc.) For us worked the most format qcow2, other formats caused different issues during deployment of instance.