TACACS for Ubuntu 20.04
Introduction
This guide will walk you through the setup of a Linux based TACACS+ Authentication Server, using Ubuntu 20.04 that authenticates against a Windows Active Directory LDAP.
This guide assumes that you are familiar with installing and configuring Ubuntu Server and can deploy or have already deployed a Windows Active Directory infrastructure.
If not you can refer to https://nil.uniza.sk/sk/riesenie-autentifikacie-a-privilege-levels-v-cisco-ios-voci-windows-radius-serveru-na-win-2019/ where you can install Active Directory Domain Services.
For a guide in English you can use: https://computingforgeeks.com/how-to-install-active-directory-domain-services-in-windows-server/?utm_content=cmp-true
This guide has been highly inspired by TACACS Linux Authentication with Active Directory
Prerequisites
- Windows Server 2019 with Active Directory Services (Domain Controller or Read-Only Domain Controller)
- Ubuntu Server (tested on 20.04 LTS)
- Internet connection to all devices
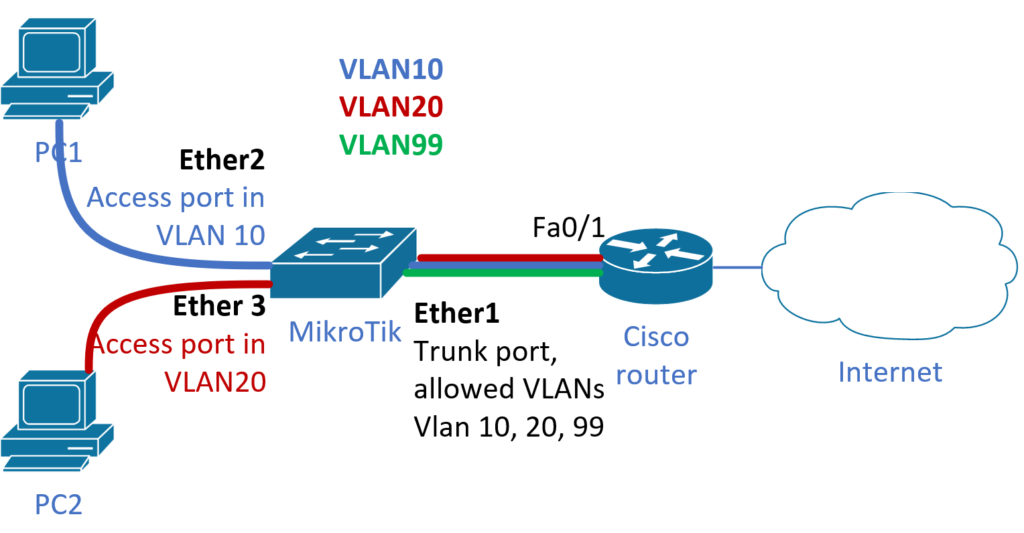
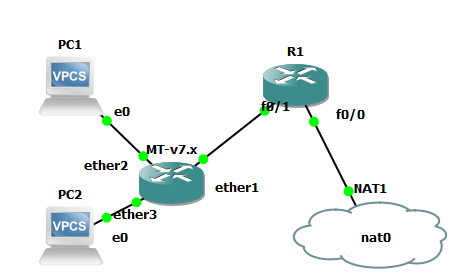
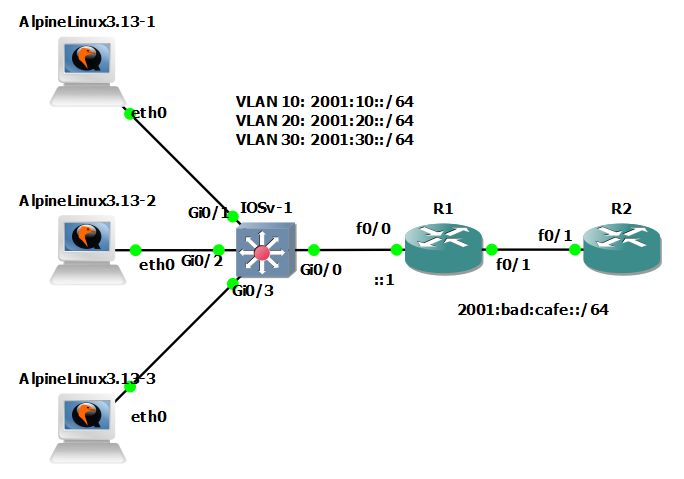
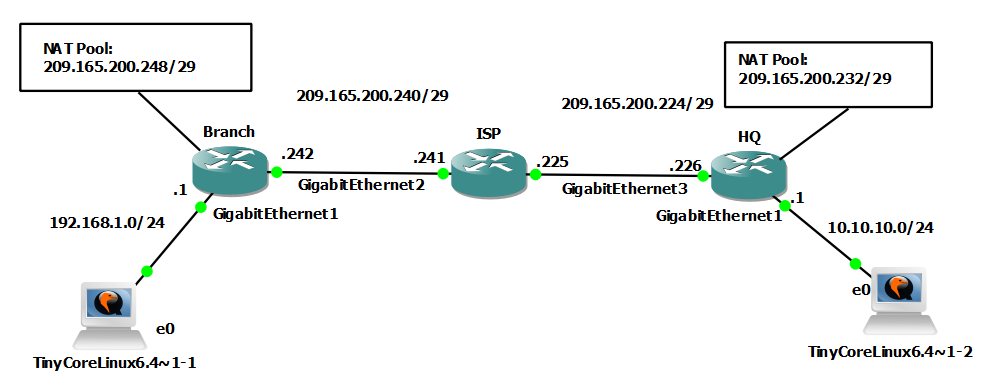
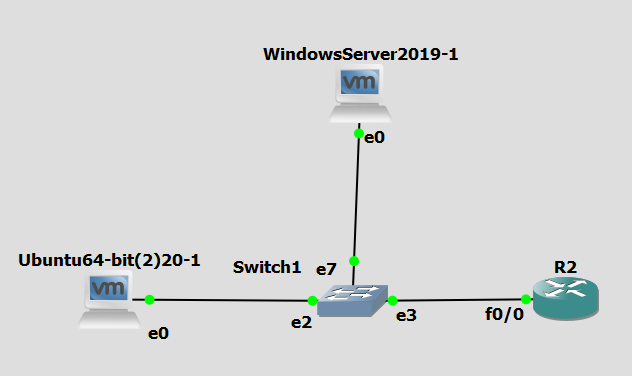
Basic Network Topology
Below is an example network topology used for testing the TACACS setup.
Windows Active Directory Requirements
First, we will setup the required items in our Active Directory system.
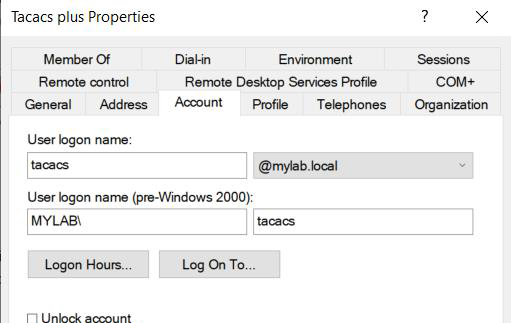
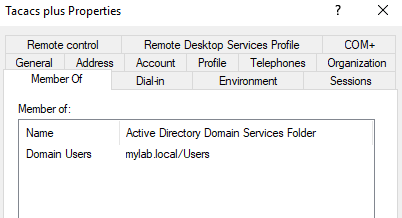
- Create a service account that TACACS will use to bind and authenticate to our AD infrastructure. Be sure to use a secure password (16 characters or longer if used in a real environment).
The user do not need any special permissions or group memberships.
- We have created several user groups used for a different types of experiments. TACACS will match these groups against the Active Directory to identify what users and permission levels to assign authenticated users. In this example, we will create four security roles.

TACACS_ADMINS
TACACS_STUDENTS_JRADMINS
TACACS_STUDENTS_SRADMINS
TACACS_STUDENTS_READ_ONLY_PRIV_LEVEL1
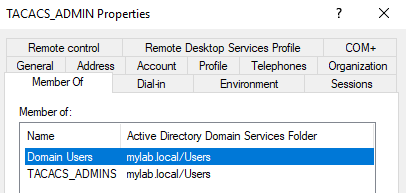
- Now create four user accounts, one for each type of user security level and add them to the security group associated with their account.
Username “TACACS_ADMIN” is a member of security group “TACACS_ADMINS”, username “TACACS_JRADMIN” is a member of security group “TACACS_STUDENTS_JRADMINS” and so on. I also recommend keeping these users in Domain Users or some other Windows pre-generated group as I had encountered issues with authenticating when users belonged only to “TACACS_ADMINS” or “TACACS_JRADMIN” group.


TACACS+ Server Installation
Before setting up a new TACACS+ Server we should talk about what TACACS and TACACS+ is.
TACACS
TACACS is defined in RFC 1492 standard and supports both TCP and UDP protocols on port number 49. TACACS permits a client to accept a username and password and send a query to a TACACS authentication server.
TACACS+
TACACS+ has replaced TACACS and provides benefit by separating the functions of Authentication, Authorization and Accounting and by encrypting all traffic between the NAS and the daemon.
https://ipwithease.com/tacacs-vs-tacacs/
I couldn’t add new commands into privileged levels using TACACS configuration as is common with views concept directly on routers. I only could permit or deny existing commands which have been preadded in each privileged level. This means that we can only permit or deny commands contained in each privileged level. To enable specific command, we would have to add it in the router manually using view command in the configuration mode.
Let’s move onto the TACACS Server installation on our Ubuntu Server. First, SSH into your Ubuntu Server or in our case access Ubuntu via GNS and install the required packages.
sudo apt-get install -y build-essential libnet-ldap-perl libpcre3-dev ntp ntpdate
Next, we are going to download the TACACS+ Server packages that includes the MAVIS (LDAP) authentication packages. This is provided by Marc Huber at pro-bono-publico.de.
You can download the source code from the GitHub repository at https://github.com/MarcJHuber/event-driven-servers/ .
Documentation is available on the original site, https://www.pro-bono-publico.de/projects/ , too.
wget https://github.com/MarcJHuber/event-driven-servers/archive/refs/heads/master.zip
In case you are unable to unzip .zip file, install zip package first.
$ apt install zip
$ unzip master.zip -d .
$ mv event-driven-servers-master tac_plus
Now, we will configure and build the tac_plus packages to our server.
$ cd tac_plus
$ sudo ./configure –etcdir=/etc/tac_plus
$ sudo make
$ sudo make install
We now need to create the logging directories on our server because the package build process does not build these out for us. We will also make sure to set the permission on these directories so that our TACACS Server software can write to them.
$ sudo mkdir -p /var/log/tac_plus /var/log/tac_plus/access /var/log/tac_plus/accounting /var/log/tac_plus/authentication
$ sudo chmod -R 755 /var/log/tac_plus
You can verify that the permissions were set correctly by running the following command:
stat –format ‚%a‘ /var/log/tac_plus
$ >> OUTPUT <<
755
We now need to verify that our MAVIS packages are working correctly. To do this execute the below command. You should see output as exampled.
/usr/local/lib/mavis/mavis_tacplus_ldap.pl < /dev/null
>> OUTPUT <<
Default server type is ‚tacacs_schema‘. You *may* need to change that to ‚generic‘ or ‚microsoft‘.
LDAP_HOSTS not defined at /usr/local/lib/mavis/mavis_tacplus_ldap.pl line 277, line 755.
If there are error messages saying “Can’t locate Net/LDAP.pm in @INC”, you need to double-check the configure and make commands at the beginning of the guide. Make sure they all completed successfully without any errors. When I had this issue, I googled it and found that I must install Net/LDAP.pm.
https://www.nntp.perl.org/group/perl.ldap/2014/04/msg3760.html
If your output above matches, then we can continue with adding the configuration for the TACACS server. Create a file tac_plus.cfg in the /etc/tac_plus folder.
Once created, we will open that file to add our configuration template.
sudo touch /etc/tac_plus/tac_plus.cfg
sudo chmod 755 /etc/tac_plus/tac_plus.cfg
sudo nano /etc/tac_plus/tac_plus.cfg
Next, we will copy and paste in the below template configuration into the tac_plus.cfg file. You will need to replace the variables that are specific to your configuration. These are identified by {{VARIABLE-NAME}} in the template configuration.
#!/usr/local/sbin/tac_plus
#The following spawnd configuration stanza accepts connections on TCP ports 49 and
#forwards these to one of the tac_plus processes. The tac_plus configuration
#configures a couple of user groups and users (that are commented) and relies on the
#MAVIS backend for additional users.
id = spawnd {
listen = { address = 0.0.0.0 port = 49 }
#Uncomment the line below for IPv6 support
#listen = { address = :: port = 49 }
spawn = {
instances min = 1
instances max = 10
}
background = yes
}
#We are assigning logging folders for future monitoring.
id = tac_plus {
access log = /var/log/tac_plus/access/%Y/%m/access-%m-%d-%Y.txt
accounting log = /var/log/tac_plus/accounting/%Y/%m/accounting-%m-%d-%Y.txt
authentication log = /var/log/tac_plus/authentication/%Y/%m/authentication-%m-%d-%Y.txt
#Mavis module
#The distribution comes with various MAVIS modules, of which the external module is
#probably the most interesting, as it interacts with simple Perl scripts to
#authenticate and authorize requests.
mavis module = external {
setenv LDAP_SERVER_TYPE = „microsoft“
#If you are using Microsoft Global Catalog with secure LDAP (SSL)
#setenv LDAP_HOSTS = „ldaps://{{AD-SERVER-IP}}:3269“
#If you are using Microsoft Global Catalog with regular LDAP (non-SSL)
setenv LDAP_HOSTS = „ldap://{{AD-SERVER-IP}}:3268“
setenv LDAP_BASE = „{{LDAP-BASE-DN}}“
setenv LDAP_SCOPE = sub
## Username ONLY Authentication
setenv LDAP_FILTER = „(&(objectClass=user)(objectClass=person)(sAMAccountName=%s))“
## Username + UPN Authentication [example: user@mydomain.lan]
# setenv LDAP_FILTER = „(&(objectClass=user)(objectClass=person)(userPrincipalName=%s))“
setenv LDAP_USER = „{{LDAP-SERVICE-ACCOUNT-USERNAME}}“
setenv LDAP_PASSWD = „{{LDAP-SERVICE-ACCOUNT-PASSWORD}}“
#Setting UNLIMIT_AD_GROUP_MEMBERSHIP to 0 will cause a NACK response if the AD account is a member of more than one security group
setenv UNLIMIT_AD_GROUP_MEMBERSHIP = 1
#I’m not 100% sure what EXPAND_AD_GROUP_MEMBERSHIP does
setenv EXPAND_AD_GROUP_MEMBERSHIP = 0
#Clear default setting of tacplus for AD_GROUP_PREFIX
setenv AD_GROUP_PREFIX = „“
#Setting REQUIRE_TACACS_GROUP_PREFIX to 1 will cause a NACK response if the AD account is not a member of a security group with the required prefix
setenv REQUIRE_TACACS_GROUP_PREFIX = 1
#DO NOT SET THE USE_TLS ENVIRONMENT VARIABLE
#TLS WILL AUTOMATICALLY BE ENABLED IF NEEDED
#FORCING THIS VARIABLE TO 1 WILL BREAK MAVIS IF TLS IS NEEDED
#setenv USE_TLS = 0
exec = /usr/local/lib/mavis/mavis_tacplus_ldap.pl
}
login backend = mavis
user backend = mavis
pap backend = mavis
skip missing groups = yes
host = world {
#Allow any IPv4 device
address = 0.0.0.0/0
#Uncomment the line below for IPv6 support
#address = ::/0
#Uncomment the line below to inject a login prompt
#prompt = „Put your custom welcome message here.\n“
#Change this to your own secure TACACS+ key
key = „{{TACACS-ENCRYPTION-KEY}}“
}
group = {{AD-ADMIN-GROUP}} {
#Permit all services by default
default service = permit
#Users will need to re-enter their AD password for the enable password (feel free to customize this however you want)
enable = login
###
### Cisco IOS Authentication
###
service = shell {
#Permit all commands
default command = permit
#Permit all command attributes
default attribute = permit
#Set privilege level to 15 on IOS/XE
set priv-lvl = 15
#Uncomment the line below for NX-OS support
#set shell:roles=“\“network-admin vdc-admin\““
#Uncomment the line below for IOS XR support
#set task = „#root-system“
}
###
### Juniper JunOS Authentication
###
service = junos-exec {
set local-user-name = {{AD-ADMIN-GROUP}}
}
}
group = {{AD-STUDENTS_JRADMINS-GROUP}} {
#Permit all services by default
default service = permit
#Users will need to re-enter their AD password for the enable password (feel free to customize this however you want)
enable = login
###
### Cisco IOS Authentication
###
service = shell {
#Permit all commands
default command = permit
#Permit all command attributes
default attribute = permit
#Set privilege level to 15 on IOS/XE
set priv-lvl = 15
#Uncomment the line below for NX-OS support
#set shell:roles=“\“network-admin vdc-admin\““
#Uncomment the line below for IOS XR support
#set task = „#root-system“
}
###
### Juniper JunOS Authentication
###
service = junos-exec {
set local-user-name = {{AD-STUDENTS_JRADMINS-GROUP}}
}
}
### BEGIN USER ACCOUNT MAPS ###
#Users have priority over groups, they are inheriting privileges from the group and
#are enabling you to do additional changes.
# user = user@example.net {
# password = mavis
# member = {{AD-ADMIN-GROUP}}
# }
# user = DEFAULT {
# password = mavis
# member = {{AD-STUDENTS_JRADMINS-GROUP}}
# }
### END USER ACCOUNT MAPS ###
}
Here is an example of our working tac_plus.cfg file on our lab servers.
#!/usr/local/sbin/tac_plus
id = spawnd {
listen = { address = 0.0.0.0 port = 49 }
#Uncomment the line below for IPv6 support
#listen = { address = :: port = 49 }
spawn = {
instances min = 1
instances max = 10
}
background = yes
}
id = tac_plus {
access log = /var/log/tac_plus/access/%Y/%m/access-%m-%d-%Y.txt
accounting log = /var/log/tac_plus/accounting/%Y/%m/accounting-%m-%d-%Y.txt
authentication log = /var/log/tac_plus/authentication/%Y/%m/authentication-%m-%d-%Y.txt
mavis module = external {
setenv LDAP_SERVER_TYPE = „microsoft“
#If you are using Microsoft Global Catalog with secure LDAP (SSL)
#setenv LDAP_HOSTS = „ldaps://172.16.10.10:3269“
#If you are using Microsoft Global Catalog with regular LDAP (non-SSL)
setenv LDAP_HOSTS = „ldap://172.16.1.2:3268“
setenv LDAP_BASE = „DC=mylab,DC=local“
setenv LDAP_SCOPE = sub
## Username ONLY Authentication
setenv LDAP_FILTER = „(&(objectClass=user)(objectClass=person)(sAMAccountName=%s))“
## Username + UPN Authentication [example: user@mydomain.lan]
# setenv LDAP_FILTER = „(&(objectClass=user)(objectClass=person)(userPrincipalName=%s))“
setenv LDAP_USER = „tacacs@mylab.local“
setenv LDAP_PASSWD = „Password123!“
#Setting UNLIMIT_AD_GROUP_MEMBERSHIP to 0 will cause a NACK response if the AD account is a member of more than one security group
setenv UNLIMIT_AD_GROUP_MEMBERSHIP = 1
#I’m not 100% sure what EXPAND_AD_GROUP_MEMBERSHIP does
setenv EXPAND_AD_GROUP_MEMBERSHIP = 0
#Clear default setting of tacplus for AD_GROUP_PREFIX
setenv AD_GROUP_PREFIX = „“
#Setting REQUIRE_TACACS_GROUP_PREFIX to 1 will cause a NACK response if the AD account is not a member of a security group with the required prefix
setenv REQUIRE_TACACS_GROUP_PREFIX = 1
#DO NOT SET THE USE_TLS ENVIRONMENT VARIABLE
#TLS WILL AUTOMATICALLY BE ENABLED IF NEEDED
#FORCING THIS VARIABLE TO 1 WILL BREAK MAVIS IF TLS IS NEEDED
#setenv USE_TLS = 0
exec = /usr/local/lib/mavis/mavis_tacplus_ldap.pl
}
login backend = mavis
user backend = mavis
pap backend = mavis
skip missing groups = yes
host = mgmtnet {
#Allow any IPv4 device
address = 192.168.255.0/24
#Uncomment the line below for IPv6 support
#address = ::/0
#Uncomment the line below to inject a login prompt
#prompt = „Put your custom welcome message here.\n“
#Change this to your own secure TACACS+ key
key = „cisco“
}
group = TACACS_ADMINS {
#Permit all services by default
default service = permit
#Users will need to re-enter their AD password for the enable password (feel free to customize this however you want)
enable = login
###
### Cisco IOS Authentication
###
service = shell {
#Permit all commands
default command = permit
#Permit all command attributes
default attribute = permit
#Set privilege level to 15 on IOS/XE
set priv-lvl = 15
#Uncomment the line below for NX-OS support
#set shell:roles=“\“network-admin vdc-admin\““
#Uncomment the line below for IOS XR support
#set task = „#root-system“
}
###
### Juniper JunOS Authentication
###
service = junos-exec {
set local-user-name = TACACS_ADMINS
}
}
group = TACACS_STUDENTS_JRADMINS {
#Permit all services by default
default service = permit
#Users will need to re-enter their AD password for the enable password (feel free to customize this however you want)
enable = login
###
### Cisco IOS Authentication
###
service = shell {
#Permit all commands
default command = permit
#Permit all command attributes
default attribute = permit
#Set privilege level to 15 on IOS/XE
set priv-lvl = 15
#Uncomment the line below for NX-OS support
#set shell:roles=“\“network-admin vdc-admin\““
#Uncomment the line below for IOS XR support
#set task = „#root-system“
}
###
### Juniper JunOS Authentication
###
service = junos-exec {
set local-user-name = TACACS_STUDENTS_JRADMINS
}
}
### BEGIN USER ACCOUNT MAPS ###
# user = user@example.net {
# password = mavis
# member = TACACS_ADMINS
# }
# user = DEFAULT {
# password = mavis
# member = TACACS_STUDENTS_JRADMINS
# }
### END USER ACCOUNT MAPS ###
}
Now we need to validate the configuration file. After you have saved and exited the tac_plus.cfg file, run the following command to verify everything was setup correctly.
/usr/local/sbin/tac_plus -P /etc/tac_plus/tac_plus.cfg
If tac_plus reports any errors, you will need to edit the tac_plus.cfg file again and correct the errors. Do not proceed further until you have corrected all the reported errors. See http://www.pro-bono-publico.de/projects/tac_plus.html for a complete configuration reference. You may also want to view the file /usr/local/lib/mavis/mavis_tacplus_ldap.pl for a detailed explanation of the available LDAP variables.
Now we need to create a SystemD service startup script for our TACACS server. Copy/Paste the below command into your SSH session. It will automatically create the required service startup script.
sudo cat < /etc/systemd/system/tac_plus.service
# systemd configuration unit for tac_plus.
# $Id: tac_plus.service,v 1.1 2011/07/22 17:04:03 marc Exp $
#
# To enable the service:
# sudo cp tac_plus.service /etc/systemd/system/
# sudo systemctl enable tac_plus.service
# sudo systemctl start tac_plus.service
#
[Unit]
Description=TACACS+ Service
After=syslog.target
[Service]
ExecStart=/usr/local/sbin/tac_plus -f /etc/tac_plus/tac_plus.cfg
KillMode=process
Restart=always
ExecReload=/bin/kill -HUP $MAINPID
[Install]
WantedBy=multi-user.target
EOF
Now you can enable the service for auto-startup and manually start the service.
sudo systemctl enable tac_plus.service
sudo systemctl start tac_plus.service
To verify that the service started, you can run the following two commands.
sudo systemctl status tac_plus.service
>> OUTPUT <<
● tac_plus.service – TACACS+ Service
Loaded: loaded (/etc/systemd/system/tac_plus.service; enabled; vendor preset: enabled)
Active: active (running) since Tue 2019-01-01 16:13:57 UTC; 1h 8min ago
Main PID: 21795 (tac_plus)
Tasks: 3 (limit: 4662)
CGroup: /system.slice/tac_plus.service
├─21795 tac_plus: 0 connections, accepting up to 600 more
├─21796 tac_plus: 0 connections
└─21797 perl /usr/local/lib/mavis/mavis_tacplus_ldap.pl
Jan 01 16:13:57 tacacs01 tac_plus[21795]: startup (version 201811291931)
Jan 01 16:13:57 tacacs01 systemd[1]: Started TACACS+ Service.
Jan 01 16:13:57 tacacs01 tac_plus[21795]: epoll event notification mechanism is being used
Jan 01 16:13:57 tacacs01 tac_plus[21795]: bind to [0.0.0.0]:49 succeeded
Jan 01 16:13:57 tacacs01 tac_plus[21796]: – Version 201811291931 initialized
Jan 01 16:13:57 tacacs01 tac_plus[21796]: epoll event notification mechanism is being used
# netstat -antp | grep „:49“
>> OUTPUT <<
tcp 0 0 0.0.0.0:49 0.0.0.0:* LISTEN 21673/tac_plus: 0 c
We are now ready to verify that the TACACS services are authentication against our Active Directory server. Run the below commands on your Ubuntu server. You should get output similar to our example.
### Test Admin Account Authentication
/usr/local/bin/mavistest -d -1 /etc/tac_plus/tac_plus.cfg tac_plus TACPLUS test.admin Password123!
>> OUTPUT <<
{{ bunch of debug output …}}
Input attribute-value-pairs:
TYPE TACPLUS
TIMESTAMP mavistest-21804-1546360707-0
USER test.admin
PASSWORD Password123!
TACTYPE AUTH
Output attribute-value-pairs:
TYPE TACPLUS
TIMESTAMP mavistest-21804-1546360707-0
USER test.admin
RESULT ACK
PASSWORD Password123!
SERIAL OwS74pPKAjcEH89PojinNQ=
DBPASSWORD password123$
TACMEMBER „R_ADMINS“ (You might also see some other Microsoft groups)
TACTYPE AUTH
### Test student Junior admin Account Authentication
/usr/local/bin/mavistest -d -1 /etc/tac_plus/tac_plus.cfg tac_plus TACPLUS TACACS_JRADMIN Password123!
>> OUTPUT <<
{{ bunch of debug output …}}
Input attribute-value-pairs:
TYPE TACPLUS
TIMESTAMP mavistest-21806-1546360743-0
USER TACACS_JRADMIN
PASSWORD Password123!
TACTYPE AUTH
Output attribute-value-pairs:
TYPE TACPLUS
TIMESTAMP mavistest-21806-1546360743-0
USER TACACS_JRADMIN
RESULT ACK
PASSWORD Password123!
SERIAL gydnsgXHXyjeQaR2JaBlhw=
DBPASSWORD Password123!
TACMEMBER „TACACS_STUDENTS_JRADMINS“
TACTYPE AUTH
From the output above, look specifically at the RESULT output and the TACMEMBER output. These should be “ACK” in the RESULT field, which means Active Directory responded and was successful, and the TACMEMBER value should match the security group associated with the user account. If you got NACK, BFD, or ERR in the RESULT field, that means something went wrong. You’ll want to double-check your Active Directory environment variables in the tac_plus.cfg file. There also might be an issue with your groups in Microsoft Server user groups.
Do not continue further until you can run the above tests and get a valid response from the user authentication.
Juniper (JunOS) Device Configuration
We are now ready to configure one of our Juniper devices for TACACS authentication. For a full en-depth understanding on setting up Juniper TACACS Authentication, we would recommend that you read the Juniper documentation for your specific device and version of software. To learn more about the different permissions flags and users classes, we would recommend reading the Junos OS Login Classes documentation. ~ In this example, we will be using a Juniper vMX Router running JunOS v14.1
First, we will configure our Juniper device to utilize the TACACS authentication server as the primary source for account authorizations, with the standard “password” (local user accounts) as a fall-back in the event the TACACS server is offline or networking is unavailable. You will need to replace the variables that are specific to your configuration. These are identified by {{VARIABLE-NAME}} in the template configuration.
## Set the system authentication order
##
set system authentication-order tacplus
set system authentication-order password
## Set the TACACS server and encryption key
##
set system tacplus-server {{TACACS-SERVER-IP}} secret „{{TACACS-ENCRYPTION-KEY}}“
set system tacplus-server {{TACACS-SERVER-IP}} single-connection
set system tacplus-server {{TACACS-SERVER-IP}} source-address {{ROUTER-SOURCE-IP}}
## Set the accounting logging services
##
set system accounting events login
set system accounting events change-log
set system accounting events interactive-commands
set system accounting destination tacplus
Here is an example configuration from our lab equipment.
set system authentication-order tacplus
set system authentication-order password
set system tacplus-server 172.16.10.11 secret „dXVHBUYX36nqd3hA“
set system tacplus-server 172.16.10.11 single-connection
set system tacplus-server 172.16.10.11 source-address 172.16.10.15
set system accounting events login
set system accounting events change-log
set system accounting events interactive-commands
set system accounting destination tacplus
## SHOW SYSTEM >> OUTPUT << ##
authentication-order [ tacplus password ];
tacplus-server {
172.16.10.11 {
secret „$9$q.PQApOcrKNdw24aji1IEhKWxNdgaZLxUHk.zFSrleMX7NV“; ## SECRET-DATA
single-connection;
source-address 172.16.10.15;
}
}
accounting {
events [ login change-log interactive-commands ];
destination {
tacplus;
}
}
Next, we need to add the configuration to the Juniper device that map the user account to the user class. This portion is very important and miss-understood very easily. The “user class” attributes can be built out however works best for your organization. However, you need to pay special attention to the “login user” accounts that are created.
The “login user” accounts that are created are NOT the “usernames” for every user that will be logging into the devices. These “names” are the direct mapping names that match what was created in the tac_plus.cfg GROUP attributes. This is where the “magic” happens on the username > group mappings.
service = junos-exec {
set local-user-name = R_TECHS
}
Add the following configuration to your Juniper device. If you named your security groups differently, then you will have to adjust the configuration to match your changes.
set system login class administrators permissions all
set system login class technicians permissions network
set system login class technicians permissions view
set system login class technicians permissions view-configuration
set system login user R_ADMINS full-name „TACACS Administrators“
set system login user R_ADMINS class administrators
set system login user R_TECHS full-name „TACACS Technicians“
set system login user R_TECHS class technicians
Once you have your configuration changes added to your device, commit them.
commit check
commit
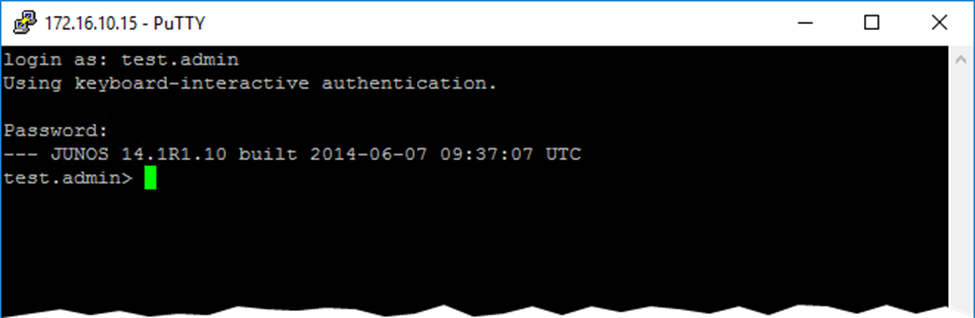
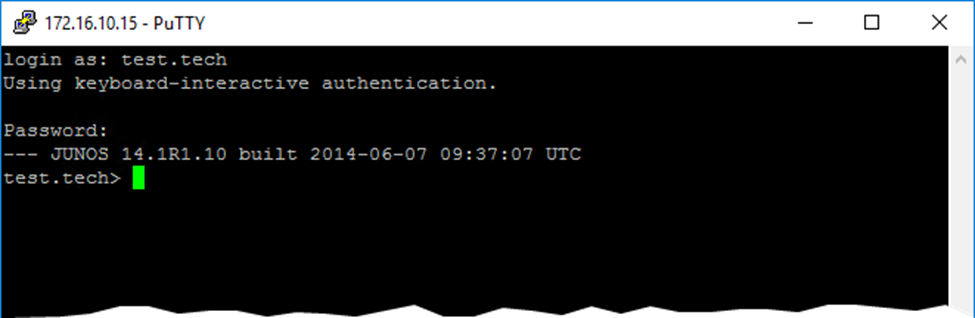
You are now ready to test your TACACS authentication with the different user accounts. SSH into your Juniper device on the management address and enter the username / password that you setup. For this example, we will be using “test.admin” and “test.tech”.
Upon a successful login, your TACACS server should be recording the accounting packets sent from the Juniper device. These accounting logs are located in /var/log/tac_plus/*
Cisco Device Configuration
We are now ready to configure one of our Cisco devices for TACACS authentication. For a full in-depth understanding on setting up Cisco AAA / TACACS Authentication, we would recommend that you read the Cisco Documentation for your specific device and version of software. Unfortunately, Cisco has done a very poor job on standardizing the configuration of the AAA settings per version and again per device type. ~ In this example, we will be using a Cisco IOS Router running version 15.2
First, we will configure our Cisco device to utilize the TACACS authentication server as the primary source for account authorizations, with the “local” user account as a fall-back in the event the TACACS server is offline, or networking is unavailable. You will need to replace the variables that are specific to your configuration. These are identified by {{VARIABLE-NAME}} in the template configuration.
Do not forget to create an RSA key and enable ssh encryption in case you do not have it enabled yet. Make sure you also have at least one local user account, if not create one please.
In case you are not able to log into your cisco devices via SSH please check your SSH configuration. You can use the following link. https://mpxxuk.wordpress.com/2016/06/05/configure-ssh-login-with-tacacs-cisco/
!
!–
!– SET THE TACACS AUTHENTICATION SERVER
!–
tacacs-server host {{TACACS-SERVER-IP}}
tacacs-server directed-request
tacacs-server key 0 {{TACACS-ENCRYPTION-KEY}}
!
!
!–
!– ESTABLISH A SECRET PASSWORD FOR CONSOLE
!–
service password-encryption
enable secret 0 {{SECURE-SECRET-PASSWORD}}
!
!–
!– SET THE AAA SECURITY ROLES
!–
!
aaa new-model
!
aaa authentication login default group tacacs+ local
aaa authentication login console local
!
aaa authorization config-commands
aaa authorization exec default group tacacs+ local if-authenticated
aaa authorization exec console if-authenticated
aaa authorization commands 1 default group tacacs+ local if-authenticated
aaa authorization commands 15 default group tacacs+ local if-authenticated
!
aaa accounting exec default start-stop group tacacs+
aaa accounting commands 1 default start-stop group tacacs+
aaa accounting commands 15 default start-stop group tacacs+
!
!
aaa session-id common
!
!
!–
!– CONFIGURE CONSOLE FOR LOCAL AUTHENTICATION ONLY
!–
line con 0
logging synchronous
login authentication console
!
!–
!– CONFIGURE VTY FOR AAA AUTHENTICATION VIA SSH ONLY
!–
line vty 0 4
logging synchronous
transport input ssh
!
!
Upon a successful login, your TACACS server should be recording the accounting packets sent from the Cisco device. These accounting logs are in /var/log/tac_plus/*
You can connect to the Cisco device from your Microsoft server using the following command:
ssh -c aes256-cbc -l TACACS_ADMIN {{IP_ADDRESS}}
Cisco Command Access Control
Below is a tac_plus.cfg configuration file that includes settings to allow restrictive ( permit | deny ) commands for the groups that we have created in our Active Directory. This was put together to show how to restrict or permit access to specific commands to users.
Keep in mind that you should access the router via ssh from the device in the network. Do not use console as it is not permitted.
First, let’s talk about what is each user group allowed or denied doing.
TACACS_ADMINS
TACACS_ADMINS user group has full permissions and is allowed to use every command in the Cisco device within privileged level 15. All commands are allowed by default.
group = TACACS_ADMINS {
#Permit all services by default
default service = permit
#Users will need to re-enter their AD password for the enable password (feel free to customize this however you want)
enable = login
###
### Cisco IOS Authentication
###
service = shell {
#Permit all commands
default command = permit
#Permit all command attributes
default attribute = permit
#Set privilege level to 15 on IOS/XE
set priv-lvl = 15
#Uncomment the line below for NX-OS support
#set shell:roles=“\“network-admin vdc-admin\““
#Uncomment the line below for IOS XR support
#set task = „#root-system“
}
}
TACACS_STUDENTS_JRADMINS
The group is permitted to do ping, traceroute and to show everything except running-config command. I also has a limited ability to change configuration settings and therefore to also access global configuration mode . Users in this group can save the configuration and to remove limited lines of the config. For more information, please see commands below. All commands are denied by default.
group = TACACS_STUDENTS_JRADMINS {
#Permit all services by default
default service = permit
#Users will need to re-enter their AD password for the enable password (feel free to customize this however you want)
enable = login
###
### Cisco IOS Authentication
###
service = shell {
#Deny all commands
default command = deny
#https://www.cisco.com/c/en/us/td/docs/ios-xml/ios/sec_usr_radcfg/configuration/xe-16-7/sec-usr-radcfg-xe-16-7-book/sec-loc-aaa-serv.html
#Deny all command attributes
default attribute = deny
#Set privilege level to 15 on IOS/XE
set priv-lvl = 15
##========================================##
## COMMAND ACCESS CONTROL RULES ##
##========================================##
# Enter enable mode
cmd = enable {
permit .*
}
# Enter global configuration of terminal
cmd = configure {
permit terminal.*
}
# Exit disable mode
cmd = disable {
permit .*
}
# Exit any configuration mode
cmd = exit {
permit .*
}
# Jump back to enable mode
cmd = end {
permit \r
}
# Enable ping
cmd = ping {
permit .*
}
# Traceroute
cmd = traceroute {
permit .*
}
# Show any configuration parameter
cmd = show {
deny „running-config“
permit .*
}
# Save running-configuration
cmd = copy {
permit „running-config startup-config „
}
# Write running-configuration to memory
cmd = write {
permit „memory „
}
# Clear commands
cmd = clear {
permit „counters FastEthernet.*“
permit „counters GigabitEthernet.*“
permit „counters Vlan.*“
permit „counters Port-channel.*“
}
# „Do“ commands run from configuration mode. Since „do“ commands
# don’t autoexpand, the shortest forms possible have to be allowed.
cmd = do {
# Allow shortened form of „ping“
permit pi.*
# Allow shortened form of „traceroute“
permit tr.*
deny „sh run.*“
# Allow shortened form of „show“
permit sh.*
}
# Enter interface configuration mode
cmd = interface {
permit FastEthernet.*
permit GigabitEthernet.*
}
# IP commands
cmd = ip {
permit route.*
permit address.*
permit „verify unicast.*“
}
# Removing configuration parameters
cmd = no {
permit „ip route.*“
permit description.*
permit „ip address.*“
permit „ip verify unicast.*“
permit „cdp enable „
permit „shutdown „
permit „switchport „
permit „switchport mode „
permit „switchport access vlan .*“
permit nonegotiate.*
permit „switchport private-vlan host-association.*“
permit „spanning-tree portfast edge „
}
# Allow adding descriptions
cmd = description {
permit .*
}
# Allow IP commands
cmd = ip {
permit address.*
permit „verify unicast.*“
}
# Allow switchport commands
cmd = switchport {
# Allow the ‚switchport‘ command without allowing all
# other switchport commands.
permit ^
permit „mode access“
permit „access vlan.*“
permit „mode private-vlan host“
permit nonegotiate
permit „private-vlan host-association.*“
permit host
}
# Allow spanning-tree commands
cmd = spanning-tree {
permit „portfast edge“
permit „portfast disable“
}
#Uncomment the line below for NX-OS support
#set shell:roles=“\“network-admin vdc-admin\““
#Uncomment the line below for IOS XR support
#set task = „#root-system“
}
}
TACACS_STUDENTS_PRIV_LVL1
The group is permitted to do ping, traceroute and to use limited amount of show commands. As privileged level enables us to use most show commands, there is no need to use privileged level 15. For more information, please see commands below. All commands are denied by default.
group = TACACS_STUDENTS_READ_ONLY_PRIV_LEVEL1 {
#Permit all services by default
default service = permit
#Users will need to re-enter their AD password for the enable password (feel free to customize this however you want)
enable = login
###
### Cisco IOS Authentication
###
service = shell {
#Deny all commands
default command = deny
#https://www.cisco.com/c/en/us/td/docs/ios-xml/ios/sec_usr_radcfg/configuration/xe-16-7/sec-usr-radcfg-xe-16-7-book/sec-loc-aaa-serv.html
#Deny all command attributes
default attribute = deny
#Set privilege level to 1 on IOS/XE
set priv-lvl = 1
##========================================##
## COMMAND ACCESS CONTROL RULES ##
##========================================##
# Exit any configuration mode
cmd = exit {
permit .*
}
# Jump back to enable mode
cmd = end {
permit \r
}
# Enable ping
cmd = ping {
permit .*
}
# Traceroute
cmd = traceroute {
permit .*
}
# Show any configuration parameter
cmd = show {
permit “sh ip route”
permit “show ospf databases”
permit “show cdp neighbors”
permit “show ip interface brief.*”
permit “show interfaces.*”
permit “show dhcp.*”
permit “show vlans.*”
deny .*
}
#Uncomment the line below for NX-OS support
#set shell:roles=“\“network-admin vdc-admin\““
#Uncomment the line below for IOS XR support
#set task = „#root-system“
}
}
Users and Groups inheritance
Users and groups can inherit their parent configuration here is an example on how you can use the inheritance to your own advantage.
Let’s say that you need junior admin student to create a new access list mentioned below, but JRADMINS permissions are not sufficient.
#Create an extended ACL to permit traffic from a specific device to multiple ports
access-list 101 permit tcp host 192.168.1.2 eq 80
access-list 101 permit tcp host 192.168.1.2 eq 443
access-list 101 permit udp host 192.168.1.2 eq 123
access-list 101 deny ip any any
You would like to allow this specific feature only for the one student, you can use the inheritance and enable the command.
### BEGIN USER ACCOUNT MAPS ###
#this way you can override group permissions
user = TACACS_JRADMIN {
#Inheriting from the group
member = TACACS_STUDENTS_JRADMINS
#default service = permit
service = shell {
cmd = access-list {
permit .*
}
}
}
On the other hand, If you would like to create a group of student senior administrators that will inherit everything from junior administrators plus are permitted to create access lists you can use similar approach. Don’t forget to create a new group in AD and assign new administrators to it.
group = TACACS_STUDENTS_SRADMINS {
member = TACACS_STUDENTS_JRADMINS
service = shell {
cmd = access-list {
permit .*
}
}
}
Full tac_plus.cfg configuration file
#!/usr/local/sbin/tac_plus
id = spawnd {
listen = { address = 0.0.0.0 port = 49 }
#Uncomment the line below for IPv6 support
#listen = { address = :: port = 49 }
spawn = {
instances min = 1
instances max = 10
}
background = yes
}
id = tac_plus {
access log = /var/log/tac_plus/access/%Y/%m/access-%m-%d-%Y.txt
accounting log = /var/log/tac_plus/accounting/%Y/%m/accounting-%m-%d-%Y.txt
authentication log = /var/log/tac_plus/authentication/%Y/%m/authentication-%m-%d-%Y.txt
mavis module = external {
setenv LDAP_SERVER_TYPE = „microsoft“
#If you are using Microsoft Global Catalog with secure LDAP (SSL)
#setenv LDAP_HOSTS = „ldaps://{{AD-SERVER-IP}}:3269“
#If you are using Microsoft Global Catalog with regular LDAP (non-SSL)
setenv LDAP_HOSTS = „ldap://172.16.1.2:3268“
setenv LDAP_BASE = „DC=mylab,DC=local“
setenv LDAP_SCOPE = sub
## Username ONLY Authentication
setenv LDAP_FILTER = „(&(objectClass=user)(objectClass=person)(sAMAccountName=%s))“
## Username + UPN Authentication [example: user@mydomain.lan]
# setenv LDAP_FILTER = „(&(objectClass=user)(objectClass=person)(userPrincipalName=%s))“
setenv LDAP_USER = „tacacs@mylab.local“
setenv LDAP_PASSWD = „Password123!“
#Setting UNLIMIT_AD_GROUP_MEMBERSHIP to 0 will cause a NACK response if the AD account is a member of more than one security group
setenv UNLIMIT_AD_GROUP_MEMBERSHIP = 1
#I’m not 100% sure what EXPAND_AD_GROUP_MEMBERSHIP does
setenv EXPAND_AD_GROUP_MEMBERSHIP = 0
#Clear default setting of tacplus for AD_GROUP_PREFIX
setenv AD_GROUP_PREFIX = „“
#Setting REQUIRE_TACACS_GROUP_PREFIX to 1 will cause a NACK response if the AD account is not a member of a security group with the required prefix
setenv REQUIRE_TACACS_GROUP_PREFIX = 1
#DO NOT SET THE USE_TLS ENVIRONMENT VARIABLE
#TLS WILL AUTOMATICALLY BE ENABLED IF NEEDED
#FORCING THIS VARIABLE TO 1 WILL BREAK MAVIS IF TLS IS NEEDED
#setenv USE_TLS = 0
exec = /usr/local/lib/mavis/mavis_tacplus_ldap.pl
}
login backend = mavis
user backend = mavis
pap backend = mavis
skip missing groups = yes
host = world {
#Allow any IPv4 device
address = 0.0.0.0/0
#Uncomment the line below for IPv6 support
#address = ::/0
#Uncomment the line below to inject a login prompt
#prompt = „Put your custom welcome message here.\n“
#Change this to your own secure TACACS+ key
key = „cisco“
}
#Full privileges with every command enabled
group = TACACS_ADMINS {
#Permit all services by default
default service = permit
#Users will need to re-enter their AD password for the enable password (feel free to customize this however you want)
enable = login
###
### Cisco IOS Authentication
###
service = shell {
#Permit all commands
default command = permit
#Permit all command attributes
default attribute = permit
#Set privilege level to 15 on IOS/XE
set priv-lvl = 15
#Uncomment the line below for NX-OS support
#set shell:roles=“\“network-admin vdc-admin\““
#Uncomment the line below for IOS XR support
#set task = „#root-system“
}
}
group = TACACS_STUDENTS_JRADMINS {
#Permit all services by default
default service = permit
#Users will need to re-enter their AD password for the enable password (feel free to customize this however you want)
enable = login
###
### Cisco IOS Authentication
###
service = shell {
#Deny all commands
default command = deny
#https://www.cisco.com/c/en/us/td/docs/ios-xml/ios/sec_usr_radcfg/configuration/xe-16-7/sec-usr-radcfg-xe-16-7-book/sec-loc-aaa-serv.html
#Deny all command attributes
default attribute = deny
#Set privilege level to 15 on IOS/XE
set priv-lvl = 15
##========================================##
## COMMAND ACCESS CONTROL RULES ##
##========================================##
# Enter enable mode
cmd = enable {
permit .*
}
# Enter global configuration of terminal
cmd = configure {
permit terminal.*
}
# Exit disable mode
cmd = disable {
permit .*
}
# Exit any configuration mode
cmd = exit {
permit .*
}
# Jump back to enable mode
cmd = end {
permit \r
}
# Enable ping
cmd = ping {
permit .*
}
# Traceroute
cmd = traceroute {
permit .*
}
# Show any configuration parameter
cmd = show {
deny „running-config“
permit .*
}
# Save running-configuration
cmd = copy {
permit „running-config startup-config „
}
# Write running-configuration to memory
cmd = write {
permit „memory „
}
# Clear commands
cmd = clear {
permit „counters FastEthernet.*“
permit „counters GigabitEthernet.*“
permit „counters Vlan.*“
permit „counters Port-channel.*“
}
# „Do“ commands run from configuration mode. Since „do“ commands
# don’t autoexpand, the shortest forms possible have to be allowed.
cmd = do {
# Allow shortened form of „ping“
permit pi.*
# Allow shortened form of „traceroute“
permit tr.*
deny „sh run.*“
# Allow shortened form of „show“
permit sh.*
}
# Enter interface configuration mode
cmd = interface {
permit FastEthernet.*
permit GigabitEthernet.*
}
# IP commands
cmd = ip {
permit route.*
permit address.*
permit „verify unicast.*“
}
# Removing configuration parameters
cmd = no {
permit „ip route.*“
permit description.*
permit „ip address.*“
permit „ip verify unicast.*“
permit „cdp enable „
permit „shutdown „
permit „switchport „
permit „switchport mode „
permit „switchport access vlan .*“
permit nonegotiate.*
permit „switchport private-vlan host-association.*“
permit „spanning-tree portfast edge „
}
# Allow adding descriptions
cmd = description {
permit .*
}
# Allow IP commands
cmd = ip {
permit address.*
permit „verify unicast.*“
}
# Allow switchport commands
cmd = switchport {
# Allow the ‚switchport‘ command without allowing all
# other switchport commands.
permit ^
permit „mode access“
permit „access vlan.*“
permit „mode private-vlan host“
permit nonegotiate
permit „private-vlan host-association.*“
permit host
}
# Allow spanning-tree commands
cmd = spanning-tree {
permit „portfast edge“
permit „portfast disable“
}
#Uncomment the line below for NX-OS support
#set shell:roles=“\“network-admin vdc-admin\““
#Uncomment the line below for IOS XR support
#set task = „#root-system“
}
}
group = TACACS_STUDENTS_READ_ONLY_PRIV_LEVEL1 {
#Permit all services by default
default service = permit
#Users will need to re-enter their AD password for the enable password (feel free to customize this however you want)
enable = login
###
### Cisco IOS Authentication
###
service = shell {
#Deny all commands
default command = deny
#https://www.cisco.com/c/en/us/td/docs/ios-xml/ios/sec_usr_radcfg/configuration/xe-16-7/sec-usr-radcfg-xe-16-7-book/sec-loc-aaa-serv.html
#Deny all command attributes
default attribute = deny
#Set privilege level to 1 on IOS/XE
set priv-lvl = 1
##========================================##
## COMMAND ACCESS CONTROL RULES ##
##========================================##
# Exit any configuration mode
cmd = exit {
permit .*
}
# Jump back to enable mode
cmd = end {
permit \r
}
# Enable ping
cmd = ping {
permit .*
}
# Traceroute
cmd = traceroute {
permit .*
}
# Show any configuration parameter
cmd = show {
permit „ip route“
permit „ospf databases“
permit „cdp neighbors“
permit „ip interface brief.*“
permit „interfaces.*“
permit „dhcp.*“
permit „vlans.*“
deny .*
}
#Uncomment the line below for NX-OS support
#set shell:roles=“\“network-admin vdc-admin\““
#Uncomment the line below for IOS XR support
#set task = „#root-system“
}
}
group = TACACS_STUDENTS_SRADMINS {
member = TACACS_STUDENTS_JRADMINS
service = shell {
cmd = access-list {
permit .*
}
}
}
### BEGIN USER ACCOUNT MAPS ###
#this way you can override group permissions
user = TACACS_JRADMIN {
#Inheriting from the group
member = TACACS_STUDENTS_JRADMINS
#default service = permit
service = shell {
cmd = access-list {
permit .*
}
}
}
#Creating a custom user in the tacacs, without AD
# user = DEFAULT {
# password = mavis
# #Inheriting configuration from the group
# member = {{AD-TECH-GROUP}}
# }
### END USER ACCOUNT MAPS ###
}
You can now try to authenticate with the new configuration. Do not forget to restart tac_plus service after configuration changes.
Tac_plus package has much more features that have not been mentioned in this guide. For more information please see the documentation.
This article is the result of the project: “A multitenant cybersecurity operations center implemented as an open cloud service with machine learning capabilities.” Project code – 09I05-03-V02-00010.