Android 4.0 x86 port installed on virtualbox have problem to provide networking services over Internet as it requires wifi adapter. We should solve this issue with following settings:
- Installed virtualbox
- Download Android x86 ISO image from http://code.google.com/p/android-x86/downloads/list. Choose android for eeepc, asus laptop iso does not work and does not allow networking modification (or I do not know how)
- Create virtualbox machine and install Android 4.0. You may follow official guide on http://www.android-x86.org/documents/installhowto or another excellent one at http://androidspin.com/2011/01/24/howto-install-android-x86-2-2-in-virtualbox/
- Check VBox network adapter settings, in my case it works for PCNET Fast III in a bridged mode
- Complete installation and run android machine
- Log in
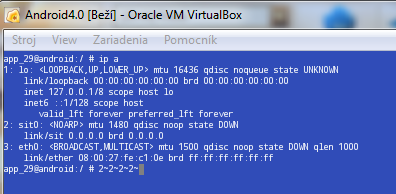
- Open applications and run terminal emulator

and type
ip a
to display networking adapters. You should be able to see adapter named eth0, as it is displayed on the following picture
Now, we will assign networking parameters (address, mask, dns server, default gateway). To do that we have two ways available, using the dhcp service, but there have to be a DHCP server available on your LAN. Or to assign IP address manually.
Manual assignments
Manually type the IP address and the mask from a address pool, which we are using in a LAN environment, where host with virtualbox is connected, in my case:
su
ifconfig eth0 192.168.10.250 netmask 255.255.255.0 up
then add a default gateway, which is needed for routing packets that are not local and have to be routed out of the LAN
route add default gw 192.168.10.1 dev eth0and finally we have to check connectivity, for examle by using ping command with target IP address.
Dynamical assignments
We have to type
dhcpcd eth0
and that is all!
Assigning DNS server address
Finally, in both cases we have to add the IP address of a DNS server, in my case
setprop net.dns1 158.193.152.2
and check ping connectivity, but now using DNS name of a target host (www.google.com for example).
Final notes
Unfortunatelly, all these settings are lost after reboot and we have to set up them again!