
There are two official guides, the first one is at http://siremis.asipto.com/install/ and, by my opinion, it is not good, probably writed for previous version of the Siremis and kamailio…following described steps is unable to install siremis version 2 with kamailio 3.1.x (six hour of troubleshooting).
Another manual is at http://kb.asipto.com/siremis:install20:main, and it looks good.
Prerequisities
Read carefully!
-
Kamailio (OpenSER) 3.1.0 installed.
-
Web server (e.g., Apache) with mod_rewrite enabled
-
PHP5 with MySQL and GD support
-
siremis database with granted user access
php GD is required for captcha images, if you do not have php5-gd, you are not able to see captcha and you can not log in. The second requirement os also very important, the apache server have to have enabled mod_rewrite!!! Without mod_rewrite there is unable login, because you are redirected on a broken web link!!!
If you will not fulfill requirements, there is an hour of troubleshooting…so simple.
Installing apache web server
apt-get install apache2 apache2-doc
Enable mod_rewrite for your apache. Enabling rewrite mode for my Apache 2 means add symlink from /etc/apache2/mods-available into /etc/apache2/mods-enabled. Without this we are not able to use siremis web after installation.
Installing php5 with mysql module
apt-get install php5 php5-mysql php5-gd
Download and install siremis 2.0
Go to your preferred donwload folder or your home folder and using wget download latest siremis from the http://siremis.asipto.com/pub/downloads/siremis/ site.
wget http://siremis.asipto.com/pub/downloads/siremis/siremis-2.0.0.tgz
Go to the www folder
cd /var/www
and extract siremis files here
tar xvfz /home/palo/siremis-2.0.0.tgz
new folder siremis-2.0.0 appear here
Web server setup
cd /etc/apache2/sites-available/
edit the apache default file
vim default
and add alias pointing to your siremis files. First guide mentioned above recommends
Alias /siremis/ "/var/www/siremis-2.0.0/siremis/"
    <Directory "/var/www/siremis-2.0.0/siremis/">
        Options Indexes FollowSymLinks MultiViews
        AllowOverride All
        Order allow,deny
        Allow from all
        RedirectMatch ^/siremis/$ /siremis/bin/
        <Files ~ "\.inc$">
            Order allow,deny
            Deny from all
        </Files>
    </Directory>
Other instructions require that following directories inside of the siremis folder have write permission for web server: siremis/log, siremis/session, siremis/files and siremis/templates/cpl. After all, do not forget restart apache.
Well, this instruction have been from the siremis page, but… with such configuration the apache server is permanentlly returning 403 Forbidden, inside of the error log is error
Directory index forbidden by Options directive: /var/www/siremis-2.0.0/siremis/bin/
Googling provide solution in adding DirectoryIndex index.php directive, but it still did not work. So…looking inside of the siremis/bin/ folder we see that there is none index file (html nor php). Therefore I’m commenting
# RedirectMatch ^/siremis/$ /siremis/bin/
Final working configuration is following (based on the second guide provided above)
Alias /siremis "/var/www/siremis-2.0.0/siremis"
    <Directory "/var/www/siremis-2.0.0/siremis">
        Options Indexes FollowSymLinks MultiViews
        DirectoryIndex index.php index.html
        AllowOverride All
        Order allow,deny
        Allow from all
#        RedirectMatch ^/siremis/$ /siremis/bin/
        <Files "\.xml$">
                Order deny,allow
                Deny from all
        </Files>
        <Files ~ "\.inc$">
            Order allow,deny
            Deny from all
        </Files>
    </Directory>
Do not forget to restart apache service. Now it look working, some web page with installation proceeding appears.
Local configuration
This step is from http://kb.asipto.com/siremis:install20:main guide. It is used to create .htaccess and Siremis configuration files, you have to run ‘make prepare’.
Go to the folder
cd /var/www/siremis-2.0.0/
and run make prepare
make prepare   updating htaccess file...
updating app.inc file...
done
If you do not have make, just install it
apt-get install make
Make sure that following directories have write access for web server user:
-
siremis/log
-
siremis/session
-
siremis/files
-
siremis/themes/default/template/cpl
Do not forget to restart the web server after doing the changes in its configuration file.
Creating siremis database
The installation of the siremis version 2 suppose that you have created the siremis database and you have a user with granted privilege access.
pstest:/etc/apache2# mysqladmin create siremis -p
Enter password:
and than create the user with granted access
mysql -p
mysql> GRANT ALL PRIVILEGES ON siremis.* TO siremis@localhost IDENTIFIED BY 'siremisrw';
Query OK, 0 rows affected (0.09 sec)
This user will we need later during the installation.
Setting up connection to the Mysql
Theare are two ways how to configure the connection between the siremis web application with the mysql database.
We may manually edit Config.xml file or start web installation wizard pointing to the http://<your.site>/siremis. Using both of them we have to setup access parameters for the siremis database, required by siremis and for the kamailio sip server database, used by kamctl and kamailio server.
Fist way
vim Config.xml
<?xml version="1.0" standalone="no"?>
<Config>
   <DataSource>
      <Database Name="Default" Driver="Pdo_Mysql" Server="localhost" Port="3306" DBName="siremis" User="openser" Password="siremisrw" Charset="utf8"/>
      <Database Name="kamailio" Driver="Pdo_Mysql" Server="localhost" Port="3306" DBName="kamailio" User="openser" Password="openserrw" Charset="utf8"/>
   </DataSource>
</Config>
This setting is for my testing Kamailio installation, described in article Adding MySQL support into Kamailio 3.1 (debian lenny) .
Second, more comfortable way is to use the siremis web wizard
Access the web page at http://<yourserver.com>/siremis. For my server
http://pstest.ps.sip.uniza.sk/siremis
URL is redirecting to the siremis installation wizard pages and we just need to follow steps described in http://kb.asipto.com/siremis:install20:main. The most critical step is two, where we have to provides correct information required for database connection. The siremis database is for internal siremis use, the kamailio database is used by the Kamailio SIP server as persistant storage, for example for SIP localization.
Check in Import Default Data > box !
That should be all!
We should be able login into siremis and work with siremis.
Final steps
Remove the install directory: siremis/install
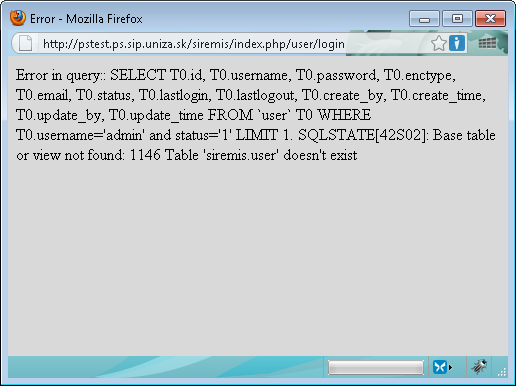
Observed problem
There have been problem caused using first installation guide, as for example 403 Forbidden web access due to RedirectMatch ^/siremis/$ /siremis/bin/ or unable to login becasue of getting following error message. The guide http://siremis.asipto.com/install/ is obsolete and will be removed.
Second guide works without problems, if we fullfil mentioned prerequisities.