
This article continues on the series of articles about running junos within GNS3 and is explaining how to make and install JunOS 12.3R6.6 router using junos domestic package under Win 7 64bit OS environment.
Nice references are:
- Juniper Junos 12.2R2.4 installation on FreeBSD using QEMU – Install FreeBSD and Junos
- Juniper Junos 12.2R2.4 installation on FreeBSD using QEMU – Adapt jinstall
- http://brezular.com/2012/07/03/installing-olive-12-1r1-9-under-qemu/
- ftp://ftp.unikon-ua.net/pub/Juniper/Olive%20Install%20Complete%20Guide%20-%20JunOS%2012.3R6%20V1-1.pdf
- https://networknutsnbolts.wordpress.com/tag/setup-juniper-on-gns3/
All solutions from links above are in general OK, but once I've used them I always ended with errros, like for example:
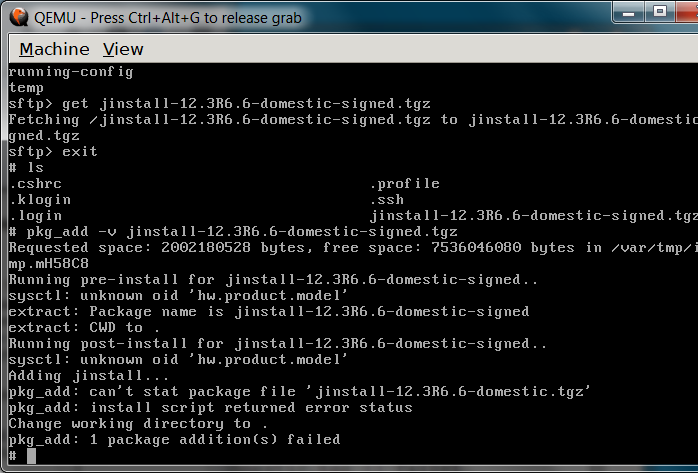
1) pkg_add: can't state package file "jinstall-12.3R6.6-domestic.tgz"
pkg_add: install script reurned error status
Solution 1, 2 described here should work.
2) This doesn’t look like a tar archive” Error in initiating “install_pkg” …
Solution 1, (2) and 3 described here should work.
Environment and Prerequisities
Here is the description of my working environment and software prerequisities
- Win 7 64 bit operating system.
- A text text editor, I prefer notepad++
- A zip util, for example 7-zip. I've used the total commander during my tests in a simialr way, doublie ckick on a tgz, or a tar file, software temporerily untared them, moving up within the package folder ziper repack the package structure back.
- Installed Qemu. I'm using the one downloaded and installed together with the GNS3 of version 1.2.3.
- Created Qemu virtual machine with installed and running FreeBSD OS inside of it. The installation of FreeBSD into Qemu is described here (Installing FreeBSD for JunOS Olive using Qemu under Win 7 64bit). Unlike the mentioned tutorial the disk parameters have to be increased (up to 12 or 16G, and also changing partition sizes). If you follow the tutorial and you are making a fresh Freebsd machine at the end just for a backup reasons make a copy of the Qemu FreeBSd image (simply Ctrl-C and Ctrl-V inside of a folder where the machine have been created).
- Some JunOS image. Download legaly somewhere on the net. I'm using jinstall-12.3R6.6-domestic-signed.tgz. The image have to be modified.
- Some free sFTP/SSH server for windows, for example FreeSSHd server, Download here. The application is required for downloading junos tgz file from windows into qemu machine (many tutorials are using Linux as the base system, where there is no problem to run telnet/ssh/ftp/sftp server).
Making a qemu Freebsd machine
Here are brief steps taken and followed from the Installing FreeBSD for JunOS Olive using Qemu under Win 7 64bit tutorial:
1) Create a machine
c:\Program Files\GNS3\qemu-2.1.0>qemu-img create -f qcow2 olive-base.img 16G

Formatting 'olive-base.img', fmt=qcow2 size=17179869184 encryption=off cluster_s
ize=65536 lazy_refcounts=off
2) Run and install FreeBsd
qemu-system-x86_64w.exe -m 1G -hda olive-base.img -cdrom 4.11-RELEASE-i386-miniinst.iso \
-boot d -localtime
3) Make following disk partitions
ad0s1a    /          4096M
ad0s1b    swap       4096M
ad0s1e    /config    256M
ad0s1f    /var       rest (7935M)
4) Finish the installation. Make a copy of fresh installed machine for other future use or for a recovery. And make one for next junos installation, I named it junos-router.img
Running just installed FreeBSD machine
Now we need start our just created FreBSD qemu machine, so boot the new machine with networking card enabled. Assign a little bit more RAM memory to speed up the installation process:
qemu-system-x86_64w.exe -m 1G -hda junos-router.img -boot /
c -localtime -net nic,macaddr=00:aa:00:60:01:01,model=e1000 -net user
The window with the qemu machine will open and after booting process, just log in using your root account and password (toor in ma case), which you have been setup during freeBsd installation.
Now as the machine need to communicate with SFTP server we need assign it an IP address, so type:
dhclient em0
ifconfig
ifconfig display that 10.0.2.15 IP address was assigned. Do not worry about it, qemu is using NAT and communication will be without problems.
Now in Windows run freeSSHd software, which is used to upload a checkpic file from the freeBSD machine and in opposite direction is required to download junos package into freebsd qemu machine. Inside of freeSSHd software you need to have at least one account required for sucesfull login (root/toor in my case), and which point out sftp path to the folder, where you have placed junos olive tgz package file. Check if the service is running. (steps are described within Making qemu JunOS router installing JunOS 10.1 OLIVE package inside of qemu FreeBSD under Win 7 64bit tutorial).
Right now, but you may do it anytime later, i will backup the true file from the FreeBSD machine into my windows folder. The true file is located in /usr/bin folder, so go there:
cd /usr/bin
ls
start the sftp session using
sftp 10.0.2.2
log into your windows sftp server using your credentials and put the true file on the sftp server
put true
Finally after sucessfull upload to windows rename it there to checkpic, the file which we will need during making junos olive package.
Modifying a Junos package
Before we start the package installation we need to modify a Junos package, as an original junos package is not suitable for direct installation (signatures, HW platform checks and so on).
So go to the folder where is your junos jinstall package placed and open it within your program choice. As i mentioned, i've used total commander directly or 7-zip. Then you my simply double click on the image file, in my case named jinstall-12.3R6.6-domestic-signed.tgz, and both programs temporarily untared it, so you may move smoothly deeper into tha package and back. Once we make changes, moving back programs ask us if should repack the package. Please answer yes.
The process of modifying junos package could be in general described, thx to the tutorial, like:
-
jinstall-X-domestic-signed.tgz
- remove signature files (md5, sha1, sig)
- +INSTALL (outer one) — fix re_name
-
jinstall-X-domestic.tgz
- +INSTALL (inner one) — fix re_name
- +REQUIRE — fix re_name
-
pkgtools.tgz
- bin/checkpic — replace with /usr/bin/true
Deleting signature files
So, open your junos archive, i.e. jinstall-12.3R6.6-domestic-signed.tgz, and remove all signature files:
jinstall-12.3R6.6-domestic-signed.tgz.md5
jinstall-12.3R6.6-domestic-signed.tgz.sha1
jinstall-12.3R6.6-domestic-signed.tgz.sig
Modifying outer +INSTALL file
Select +INSTALL file and using drag an drop copy +INSTALL file into your desktop, then open it using notepad++. Once opened search for re_name string, look for following lines
check_arch_compatibility()
{
    re_name=`/sbin/sysctl -n hw.re.name 2>/dev/null`
    if [ -z "$re_name" ]; then
        Error "hw.re.name sysctl not supported."
    fi

    case "$re_name" in
...
Comment and modify the lines to look like:
check_arch_compatibility()
{
    #re_name=`/sbin/sysctl -n hw.re.name 2>/dev/null`
    re_name="Olive"
this commenting recommends all guides. The guide Juniper Junos 12.2R2.4 installation on FreeBSD using QEMU – Adapt jinstall recommends also following. Search the file for string “extractInner”. It will look like this:
...
extractInner
    if [ -d $etc_pkgdir/$pkgname ] ; then
        # see if the package will be happy before we de-install
        RunREQUIRE || exit 1
        echo "Auto-deleting old $pkgname..."
        PKG_UPGRADE=: pkg_delete $pkgname
    fi
    echo "Adding jinstall..."
    pkg_add $PKG_FORCE $inner || fail=1
...
modify it adding lines to look like
#pkg_add $PKG_FORCE $inner || fail=1
pkg_add $PKG_FORCE jinstall-12.3R6.6-domestic.tgz || fail=1
Save the changes and then drag and drop the file back to your total commander (or 7zip) archive window!
Note: I recomend to keep reading and look at the following Troubleshooting chapter. There are recommend to modify previous lines to:
#pkg_add $PKG_FORCE $inner || fail=1
pkg_add $PKG_FORCE /var/tmp/jinstall-12.3R6.6-domestic.tgz || fail=1
Modifying inner +INSTALL and +REQUIRE files
Now we need to go deeper into the archive, so double-click “jinstall-12.3R6.6-domestic.tgz” and “jinstall-12.3R6.6-domestic.tar” to show its content.
At this level there are other +INSTALL file and another one named +REQUIRE. Open both of them the same way as we do for first +INSTALL and apply the same changes as we do for “re_name” and as was described above.
...
check_arch_compatibility()
{
    #re_name=`/sbin/sysctl -n hw.re.name 2>/dev/null`
    re_name="Olive"
...
Do not forget save the changes and then drag and drop the files back to your total commander (or 7zip) archive window!
At the same place (package level) as +INSTALL and+REQUIRE files are another archive named pkgtools.tgz. The archive have to be modified, where we need to change the checkpic file of the archive for the checkpic file downloaded from the FreeBSd machine (i.e. true file). so, double click on the pkgtools.tgz, then pkgtools.tar, and there are two folders /bin and /pkg. Go into /bin, there is the checkpic file, size arround 300kB, 400kB. Replace the original file with the checkpic file which we already downloaded (in original it was true file renamed to checkpic) from the BSD machine, the size is arround 3kB.
Now move up within the package (archive) structure, 7-zip and even total commander will repack all archives back. Once we finish, we may start the main installation.
This is the step, where all guides ends and theirs installations (described here within the next Junos package installation chapter) were sucessfull.
But unfortunatelly not in my case. So you may try it on your own, jump through troubleshooting chapter and go directly to the next Junos package installation chapter, which describes the installation. You will see your results.
However I recomend you go through the installation chapter and also look into the next Troubleshooting and solving chapter. In the chapter I'm giving explanations what works for me.
Troubleshooting and solving
As I mentioned, the installation procedure described till now have finished in my case allways with errors.
Solution 1
The first one error was:
pkg_add: can't state package file "jinstall-12.3R6.6-domestic.tgz"
pkg_add: install script reurned error status
pkg_add: 1 package installation(s) failed
screen:
We may solve it following way.
If you already did the installation whose ended with fail, pls. remove the junos package from the BSD machine, because we need modify an +INSTALL file little bit more:
cd /var/tmp
rm jinstall-12R6.6-domestic-signed.tgz
If you did not make a try, just ignore lines above and continue.
We need to repeat all steps as we did before, or if we keep the final package, we just need to enhance the first step. There we have edited outer +INSTALL file. There is a section describing:
...
extractInner
    if [ -d $etc_pkgdir/$pkgname ] ; then
        # see if the package will be happy before we de-install
        RunREQUIRE || exit 1
        echo "Auto-deleting old $pkgname..."
        PKG_UPGRADE=: pkg_delete $pkgname
    fi
    echo "Adding jinstall..."
    pkg_add $PKG_FORCE $inner || fail=1
...
where was recommended to modify the file adding lines to look like
#pkg_add $PKG_FORCE $inner || fail=1
pkg_add $PKG_FORCE jinstall-12.3R6.6-domestic.tgz || fail=1
we need to change it:
#pkg_add $PKG_FORCE $inner || fail=1
pkg_add $PKG_FORCE /var/tmp/jinstall-12.3R6.6-domestic.tgz || fail=1
The /var/tmp is a place from which I'm doing the installation. and where the package manager look for jinstall-12.3R6.6-domestic.tgz file and which is missing.
So, save the changes and then drag and drop the file back to your total commander (or 7zip) archive window and repack all archive back (up to install-12.3R6.6-domestic-signed.tgz).
If done, as the next step we exctract required file jinstall-12.3R6.6-domestic.tgz from the main archive jinstall-12.3R6.6-domestic-signed.tgz. Both files have to be downloaded to the FreeBSD machine to the same folder (as is described within installation chapter). In my case it is /var/tmp, and finally inside we have to have both mentioned files (jinstall-12.3R6.6-domestic-signed.tgz package and jinstall-12.3R6.6-domestic-signed.tgz).
Then restart the installation again (steps are within the installation chapter) however reflect mentioned changes.
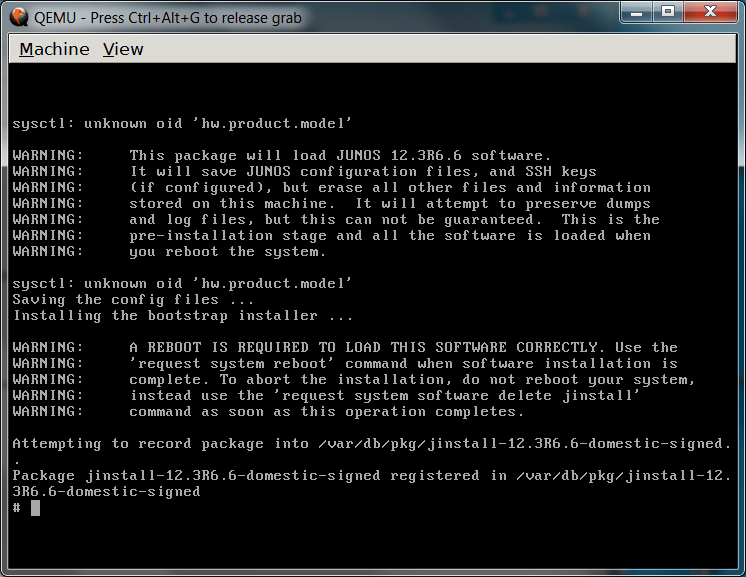
It should be sucessful now:
Solution 2
This solution just simplify the Solution 1. We does not need to do anything just exctract the file jinstall-12.3R6.6-domestic.tgz from the main archive jinstall-12.3R6.6-domestic-signed.tgz which we made first time.
Further steps are the same as are described within the Installation chapter, however instead of downloading and installing the install-12.3R6.6-domestic-signed.tgz file, we dovnload and install the jinstall-12.3R6.6-domestic.tgz file.
Solution 3
The last solution ever I have found is described here:Installing Olive 10.4R1 under VMware , however need browse through comments. They suggest to do evrything (re_name and so on) as usually but adds:
Open the outer +INSTALL file and look for
inner=jinstall_package
Change it to the actual name of the inner package:
inner=jinstall-12.1R1.9-domestic.tgz
following the other comment continue within the outer +INSTALL file, where we need changes
1. Comment the extractInner line
# extractInner
2. Comment and add like the following
# pkg_add $PKG_FORCE $inner || fail=1
pkg_add $PKG_FORCE jinstall-11.2R2.4-domestic.tgz || fail=1
Now pack them and do the pkg_add and it should install successfully …
Junos package installation
Now we may proceed to the installation as we have all pieces prepared. Just recollect them:
- started qemu freebsd machine with an IP address
- started ssh service within host windows system
- modified junos jinstall package
so, go to your qemu bsd machine and then to /var/tmp dir
cd /var/tmp
then open
sftp 10.0.2.2
and get tha package
ls
get jinstall-12.3R6.6-domestic-signed.tgz
once the package is downloaded, exit sftp and start the main install process
pkg_add -f jinstall-12.3R6.6-domestic-signed.tgz
The package installation takes a few minutes, and after sucess, we have to reboot the qemu machine with "halt" BSD command. After our machine was shut down, close the qemu window (or press Ctrl Alt 2).
Now we have to complete main junos installation process. This require booting the junos router image. Be able to start and observe the installation process we redirect output to the telnet server, port 3001, and also we initiate the image booting just after telnet login:
qemu.exe -m 1G -hda junos-router.img -serial \
telnet:0.0.0.0:3001,server
and as the next step (required to start installation in our case) we have to use putty\kitty\telnet to make a telnet session on localhost, port 3001.
Using telnet client loged to the machine we are able observe the output from boot and install process. During the junos installation process qemu machine may reboot many, we have to patiently (looks there is no activity, but be patient, we may observe that image size is growing) wait for the end (from couple of minutes to tens of minutes, depends on the amount of emulated RAM and HW performance).
Finally, we get the login prompt (hura). And after login as root we should run
cli
which provide us with Junos prompt.
Making GNS3 version 1 tolopology of juniper routers